DevTime&Contrast
Why Development Time is Important |

A common practice in the development of wet plate images is to pour on the developer and "wait for an image to come up". Sound easy. And it is...most of the time. Until something goes wrong.
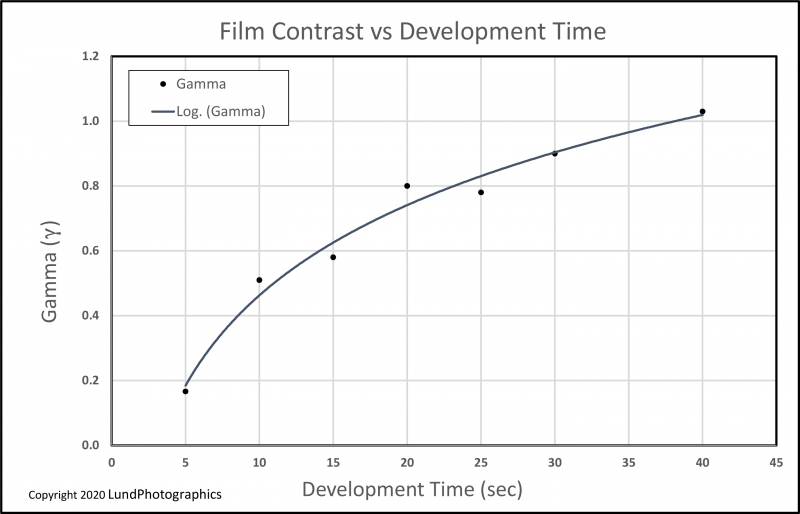
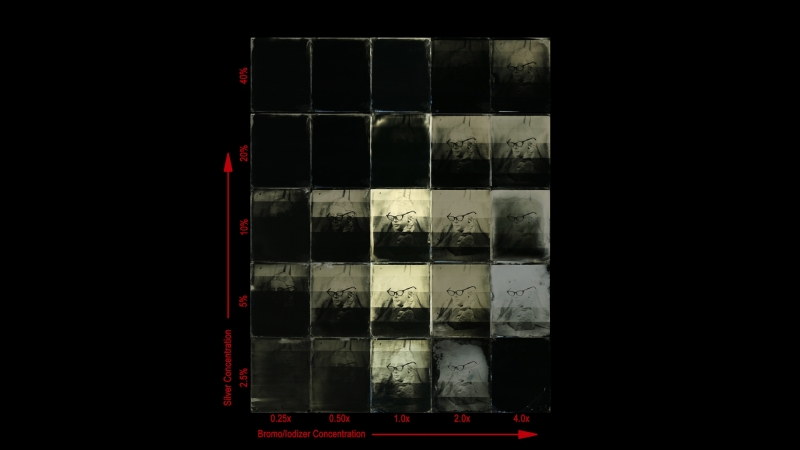
Why not hedge your bet and improve your technique by controlling the development time? In my workshops, I always stress the use of a metronome for timing development. Here's why: At the very least it will provide a higher degree of consistency in the development of your images, but more importantly, for wet plate collodion photography, the control for image contrast is development time. The chart above shows how the image gamma (loosely translated as image contrast) varies with development time. In the image below you can see that lower image contrast corresponds with shorter development times, while higher image contrast corresponds with longer development times. The range of development times that produces the greatest amount of contrast change occurs between 10 and 25 seconds when using a 5% ferrous sulfate developer.
Contrast Comparison |

Because exposure and development work hand in hand, the next point to consider when choosing a development time is finding the appropriate exposure (aperture/exposure time combination). To calibrate your exposure and development here's what I suggest to my workshop students: Start by setting up a scene in your studio with artificial lighting that you can control and keep constant. If you're chasing the sun with outdoor exposures, it makes this part of the process a little more difficult. Choose a development time; then shoot an in-camera test plate (see our blog on making in camera test plates) and develop it for the chosen amount of time. When the appropriate time comes up, stop development regardles of what you see on the plate. Don't even look at the image. It is what it is. After fixing and drying the test plate, evaluate the image strips. If you've guessed correctly when setting up the exposure sequence for the test plate, you'll find strips that are under exposed on one end and over exposed on the other, with a strip near the middle that even Goldilocks would be please to have. If you weren't so lucky, you may find all of the strips are under exposed or all of them are over exposed. Simply adjust your exposure time accordingly for the next test plate and shoot it again. Do this until you get a test plate that gives you a properly exposed strip. Record the exposure values for the strip that's correct. This is the exposure you'll need (light intensity, aperture, and exposure time) for this particular development time. Shoot a full plate using this exposure and development time. Write the development time and exposure details on the back of the plate and save this for future reference. Repeat this with a handful of other development times. Now you can compare the difference between the properly processed plates. All of the plates should be pretty close in image density, but you'll easily see the difference in image contrast.
When it comes time to calibrate your setup for outdoor exposures, there's one more piece of information you'll need to record. That's light intensity. To do this, use an incident light meter to record the intensity of the light in terms of exposure index (EI) or exposure value (EV). Each whole number increment in EI represents either a doubling or halving of light intensity or a difference of one stop. See our blog post on using light meters with wet plate to get the full story on their proper use when shooting collodion.
Now that you have a handle on development times, you'll be able to choose a development time that corresponds to a level of image contrast appropriate for the scene you're shooting.
As with everything, however, there are limits to choosing a development time. If your development times are too short, the image will be poorly defined and blotchy. At the other extreme, excessive development time will reveal itself as "noisy" or "foggy" shadow areas in the image that are no longer the clear black they should be (see our blog post on the hazards of over development). Experience will tell you where these limits are and how much they vary depending upon material choice and techniques used.