Using a Light Meter With Collodion Film
Using a Light Meter with Collodion Film
The first thing to note about collodion is that it’s sensitive well into the ultra violet region of the spectrum; a region neither our eyes nor our light meters will detect. Collodion becomes significantly less sensitive as the color of illumination moves away from green, through yellow, orange, and finally red; a color collodion film does not "see" at all.
Ordinary light meters will not work for measuring UV light intensity directly, but if we make the reasonable assumption that when shooting in daylight and open shade the UV light intensity tracks uniformly with visible light intensity, we can use a light meter to help us estimate the changes in light intensity when moving from one lighting condition to another. When stated another way, this assumption means that when the scene you're about to photograph gets brighter in the visible portion of the spectrum (which the light meter can see), it gets equally brighter in the UV portion of the spectrum (which the light meter can’t see). This is a workable assumption if you exclude metering within a couple of hours after sunrise or before sunset, when the color quality of the light is nearer to the red, less actinic, end of the spectrum.
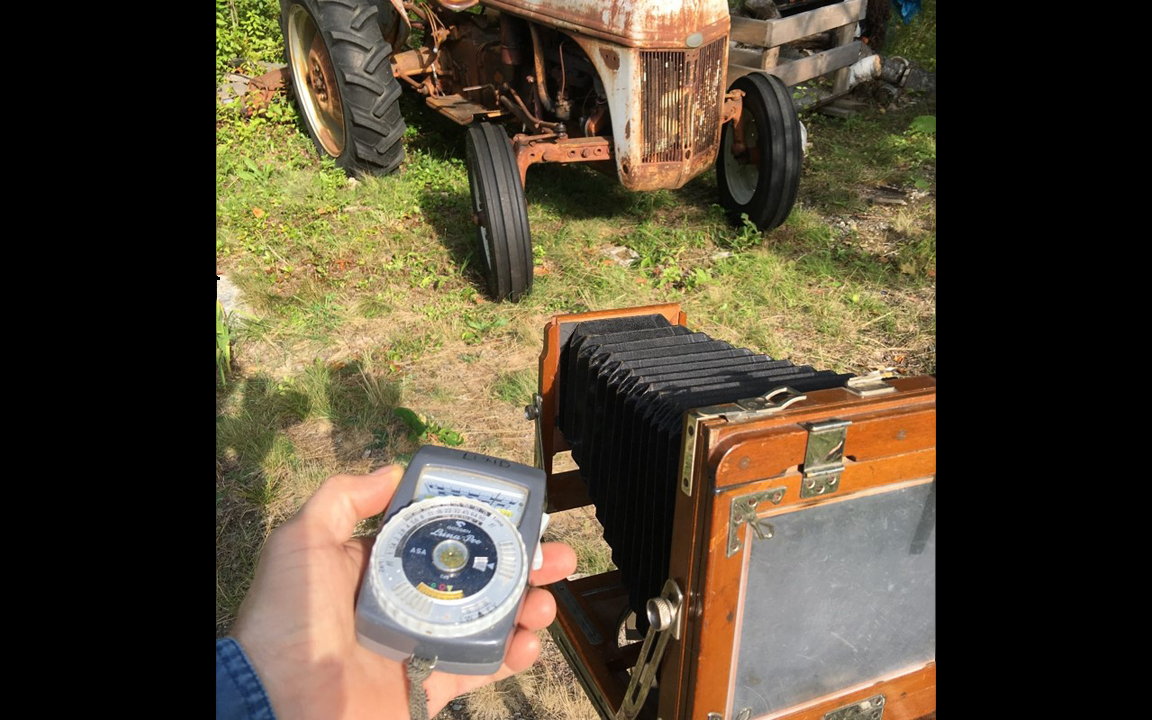
The second requirement for using a light meter to estimate collodion exposure times, is that the meter must be used as an incident light meter. Why? Because different objects in your scene will reflect different amounts of UV light, and you’ll be unable to predict which areas are UV bright or UV dark by viewing the scene in visible light (nor by using your reflection light-meter). For example, a navy blue fabric will appear dark on panchromatic film because it reflects little visible light, yet the same fabric appears bright in collodion images because it reflects a great deal of UV light. A reflection meter would give you erroneous readings if attempting to meter for UV exposure. Saying it again, using a light-meter to estimate UV exposures will only work when metering the light intensity falling on the scene (incident light metering), and not the light reflected from the scene (reflected light metering).
Now that we’ve gotten that out of the way, let’s put this into practice. The first thing you’ll need to do is determine a correct exposure by shooting a test plate. Once a good exposure is obtained on collodion, then, meter the scene and record the Exposure Index (EI) or Exposure Value (EV) that's indicated on the meter. This will be your baseline exposure to which all subsequent exposures will be compared.
Metering after an exposure may seem quite the opposite of what you've come to expect, however, there is method to this madness! Even though the meter didn't help us with the first exposure (that's why we needed the test strip), it will help us with each subsequent exposure. Don't worry about ASA or f-stops at this point; all we're looking for are relative differences in light intensity as we move to our next scene.
When we set up the next shot under different lighting conditions, meter the scene first and record the EI. The difference between the original exposure index and the new exposure index is the number of stops difference in light intensity between the two scenes, and this is what you will use to determine your new exposure setting (f-stop and exposure time). Remember, a change of one unit on the EI scale is equivalent to a change of one stop, or a doubling (or halving) of the exposure time. So, if the scene brightness changed by 3 units of EI, then you know that you need to change the f-stop on your camera by 3 stops, or you need to change the exposure time by an equivalent of 3 stops (or use some combination of both that adds up to 3 stops). This method of metering will often save a great deal of guess work and bring you very close to the proper exposure on the first try.